| Previous | Contents | Index |
Once you have linked your program, you can use the DCL command RUN to execute it. The RUN command has the following format:
RUN [/[NO]DEBUG] file-spec [/[NO]DEBUG] |
/[NO]DEBUG
Is an optional qualifier. Specify the /DEBUG qualifier to invoke the debugger if the image was not linked with it. You cannot use /DEBUG on images linked with the /NOTRACEBACK qualifier. If the image was linked with the /DEBUG qualifier and you do not want the debugger to prompt you, use the /NODEBUG qualifier. The default action depends on whether the file was linked with the /DEBUG qualifier.file-spec
Specifies the file you want to run.
The following example executes the image SAMPLE.EXE without invoking the debugger:
$ RUN SAMPLE/NODEBUG |
See Chapter 3 for more information on debugging programs.
During execution, an image can generate a fatal error called an exception condition. When an exception condition occurs, the system displays an error message. Run-time errors can also be issued by the operating system or by certain utilities, such as the OpenVMS Sort Utility.
For example, if an integer divide-by-zero condition occurs and if no ON-unit for this condition exists in any active procedure block, the following run-time messages appear:
%PLI-F-ERROR, PL/I ERROR condition signaled -SYSTEM-F-FLTDIV_F, arithmetic fault, floating divide by zero at PC=000007C4, PSL=03C000A5 |
These messages are followed by a traceback message like the following:
%TRACE-F-TRACEBACK, symbolic stack dump follows module name routine name line relative PC absolute PC SETUP DIVIDE 9 00000074 000007C4 SETUP BEGIN%4 4 00000035 00000707 SETUP SETUP 4 0000000C 000006D0 LIBS NEXT 14 00000044 000006A3 LIBS LIBS 15 0000004C 0000065E |
module name
Indicates the name of a level-1 procedure that was active when the error occurred. The first module name is the name of the module in which the error occurred. Each subsequent line gives the name of the caller of the procedure named on the previous line. In this example, the level-1 procedures are LIBS and SETUP; a call to SETUP occurred during the execution of LIBS.routine name
Indicates the entry name of the internal procedure or block in the calling sequence. When BEGIN%n appears in this column, it indicates that an unlabeled begin block, a PUT statement, or a GET statement was active when the error occurred.PL/I assigns labels to these blocks, giving them names in this form, where n is the source program line number on which the block is entered.
In this example, an unlabeled begin block or PUT or GET statement occurs on line 4 of the routine SETUP; within this block or statement, the routine DIVIDE was invoked. Thus, this traceback indicates that the error occurred during execution of an instruction generated for the source statement on line 9, in the procedure DIVIDE.
line
Indicates the source program line number (generated by the compiler) of the statement at which the error occurred, or at which the call or reference to the next procedure was made. This line number matches the line numbers on the listing file created if /LIST was specified to the compiler.relative PC
Gives the value of the PC (program counter). This value represents the location in the program image at which the error occurred or at which a procedure was called. The location is relative to the virtual memory address that the linker assigned to the code program section of the module indicated by module name.absolute PC
Gives the value of the PC in absolute terms, that is, the actual address in virtual memory that represents the location at which the error occurred.Traceback information is available at run time only for modules that were compiled and linked with the traceback option in effect. The traceback option is in effect by default for both the PLI and LINK commands. You can use the PLI command qualifier /NODEBUG and the LINK command qualifier /NOTRACEBACK to exclude traceback information. However, it is recommended that you exclude traceback information only from thoroughly debugged program modules.
For a complete list of PL/I run-time error messages, see Appendix A.
This chapter is an introduction to using the OpenVMS Debugger with PL/I programs. This chapter provides the following information:
For complete reference information on the OpenVMS Debugger, see the
OpenVMS Debugger Manual. Online HELP is available during debugging sessions.
3.1 Overview
A debugger is a tool that helps you locate run-time errors quickly. It is used with a program that has already been compiled and linked successfully, but does not run correctly. For example, the output may be obviously wrong, or the program goes into an infinite loop or terminates prematurely. The debugger enables you to observe and manipulate the program's execution interactively so that you can locate the point at which the program stopped working correctly.
The OpenVMS Debugger is a symbolic debugger, which means that you can refer to program locations by the symbols (names) you used for those locations in your program-the names of variables, routines, labels, and so on. You do not need to use virtual addresses to refer to memory locations.
The debugger recognizes the syntax, expressions, data typing, and other constructs of PL/I, as well as other VAX languages including:
If your program is written in more than one language, you can change from one language to another during a debugging session. The current source language determines the format used for entering and displaying data, as well as other features that have language-specific settings (for example, comment characters, operators and operator precedence, and case sensitivity or insensitivity).
By issuing debugger commands at your terminal, you can perform the following operations:
Such techniques allow you to isolate an error in your code much more quickly than you could without the debugger.
Once you have found the error in the program, you can then edit the
source code and compile, link, and run the corrected version.
3.2 Features of the Debugger
The OpenVMS Debugger provides the following features to help you debug your programs:
This section explains how to use the debugger with PL/I
programs. The section focuses on basic debugger functions, to get you
started quickly. It also provides any debugger information that is
specific to PL/I. For more detailed information that is not
specific to a particular language, see the OpenVMS Debugger Manual.
3.3.1 Compiling and Linking a Program to Prepare for Debugging
Before you can use the debugger, you must compile and link your program as explained in this section. The following example shows how to compile and link a PL/I program (consisting of a single compilation unit named INVENTORY) to prepare for using the debugger.
$ PLI/DEBUG/NOOPTIMIZE INVENTORY $ LINK/DEBUG INVENTORY |
The /DEBUG qualifier on the PLI command causes the compiler to write the debug symbol records associated with INVENTORY into the object module, INVENTORY.OBJ. These records allow you to use the names of variables and other symbols declared in INVENTORY in debugger commands. (If your program has several compilation units, you must compile each unit that you want to debug with the /DEBUG qualifier.)
You should use the /NOOPTIMIZE qualifier when you compile a program in preparation for debugging. Otherwise, if the object code is optimized (to reduce the size of the program and make it run faster), the contents of some program locations may be inconsistent with what you might expect from viewing the source code. After debugging the program, you should recompile it without the /NOOPTIMIZE qualifier.
The /DEBUG qualifier on the LINK command causes the linker to include
all symbol information that is contained in INVENTORY.OBJ in the
executable image. This qualifier also causes the OpenVMS image
activator to start the debugger at run time. (If your program has
several object modules, you may need to specify the other modules in
the LINK command.)
3.3.2 Starting and Terminating a Debugging Session
To invoke the debugger, issue the DCL command RUN. The following message will appear on your screen:
$ RUN INVENTORY
                     OpenVMS DEBUG Version 5.4

%DEBUG-I-INITIAL, language is PL/I, module set to 'INVENTORY'
DBG>
|
The INITIAL message indicates that the debugging session is initialized for a PL/I program and that the name of the main program unit is INVENTORY. The DBG> prompt indicates that you can now type debugger commands. At this point, if you type the GO command, program execution begins and continues until it is forced to pause or stop (for example, if the program prompts you for input, or an error occurs).
If you have a mixed-language program that includes an Ada package, the following message will appear on your screen instead of the previous one when you invoke the debugger:
$ RUN INVENTORY
                     OpenVMS DEBUG Version <VMS_VERSION>

%DEBUG-I-INITIAL, language is PL/I, module set to 'INVENTORY'
%DEBUG-I-NOTATMAIN, type GO to get to start of main program
DBG>
|
The NOTATMAIN message indicates that execution is suspended before the start of the main program, so that you can execute initialization code under debugger control. Typing the GO command places you at the start of the main program. At that point, type the GO command again to start program execution. Execution continues until it is forced to pause or stop (for example, if the program prompts you for input, or an error occurs).
The following message indicates that your program has completed successfully:
%DEBUG-I-EXITSTATUS, is '%SYSTEM-S-NORMAL, normal successful completion' DBG> |
To interrupt a debugging session and return to the DCL level, press Ctrl/y. This is useful if, for example, your program loops or you want to interrupt a debugger command that is still in progress.
To resume the debugging session after a Ctrl/y interruption, type either the CONTINUE or the DEBUG command at the DCL level. Use the CONTINUE command to return to the point at which you interrupted the debugging session. If you interrupted the session because of an infinite loop, use the DEBUG command instead. The DEBUG command returns you to the debugger prompt so that you can type another command. For example:
DBG> GO
.
    .
    .
[Ctrl/y]
Interrupt

$ DEBUG
DBG>
|
To end a debugging session, type the EXIT command or press Ctrl/z:
DBG> EXIT $ |
You can issue debugger commands anytime you see the debugger prompt (DBG>). Type the command at the keyboard and press the Return key. You can issue several commands on a line by separating the command strings with semicolons (;). As with DCL commands, you can continue a command string on a new line by ending the previous line with a hyphen (-).
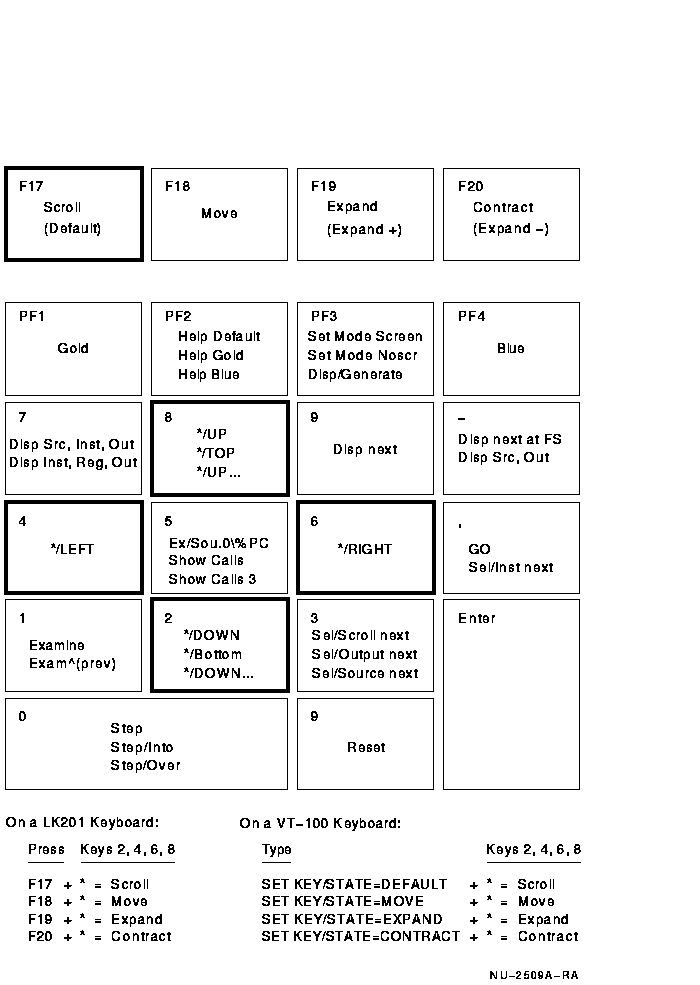
Alternatively, you can use the numeric keypad to issue certain commands. Figure 3-1 identifies the predefined key functions. You can also redefine key functions with the DEFINE/KEY command.
Most keypad keys have three predefined functions-default, GOLD, and BLUE. (The PF1 key is known as the GOLD key; the PF4 key is known as the BLUE key.) To obtain a key's default function, press the key. To obtain its GOLD function, first press the PF1 key, and then the key. To obtain its BLUE function, first press the PF4 key, and then the key.
In Figure 3-1, the default, GOLD, and BLUE functions are listed within each key's outline, from top to bottom, respectively. For example, pressing keypad key 0 issues the STEP command; pressing key PF1 and then key 0 issues the STEP/INTO command; pressing key PF4 and then key 0 issues the STEP/OVER command.
Type the command HELP KEYPAD to get help on the keypad key definitions.
Figure 3-1 Debugger Keypad Key Functions
The debugger provides two modes for displaying information: noscreen
mode and screen mode. By default, when you invoke the debugger, you are
in noscreen mode, but you may find that it is easier to view your
source code in screen mode. Both modes are briefly described in the
following sections.
3.3.4.1 Noscreen Mode
Noscreen mode is the default, line-oriented mode of displaying input and output. To invoke noscreen mode from screen mode, press the keypad key sequence GOLD-PF3. See the sample debugging session in Section 3.4 for a demonstration of noscreen mode.
In noscreen mode, you can use the TYPE command to display one or more source lines. For example, the following command displays line 3 of the module whose code is currently executing:
DBG> TYPE 3 3: I = 7; DBG> |
The display of source lines is independent of program execution. To display source code from a module other than the one whose code is currently executing, use the TYPE command with a path name to specify the module. For example, the following command displays lines 16 through 21 of module TEST:
DBG> TYPE TEST\16:21 |
To invoke screen mode, press keypad key PF3. In screen mode, the debugger splits the screen into three displays named SRC, OUT, and PROMPT, by default. The following example shows how your screen will appear in screen mode.
- SRC: module MAIN -scroll-source------------------------
     1: MAIN:  PROCEDURE OPTIONS (MAIN);
     2: DECLARE (I,J,K) FIXED BINARY;
     3:   I = 7;
->   4:   J = 4;
     5:   K = I + J;
     6: END;


- OUT -output---------------------------------------------
stepped to MAIN\%LINE 4
MAIN\I: 7
MAIN\J: 50331649


- PROMPT -error-program-prompt----------------------------
DBG> STEP 2
DBG> EXAMINE I,J
DBG>
|
The SRC display, at the top of the screen, shows the source code of the module (compilation unit) whose code is currently executing. An arrow in the left column points to the next line to be executed, which corresponds to the current value of the program counter (PC). The line numbers, which are assigned by the compiler, match those in a listing file.
The OUT display, in the middle of the screen, captures the debugger's output in response to the commands that you issue.
The PROMPT display, at the bottom of the screen, shows the debugger prompt (DBG>), your input, debugger diagnostic messages, and program output. In the example, the two debugger commands that have been issued (STEP 2 and EXAMINE I,J) are displayed.
(The unpredictable value reported by the debugger for J indicates that line 4 has not been executed yet; line 4 will subsequently assign the value 4 to J.)
The SRC and OUT displays can be scrolled to display information beyond the window's edge. Press keypad key 8 to scroll up and keypad key 2 to scroll down. Use keypad key 3 to change the display to be scrolled (by default, the SRC display is scrolled). Scrolling a display does not affect program execution.
If the debugger cannot locate source lines for the routine that is currently executing, it attempts to display source lines in the next routine down on the call stack for which source lines are available and issues the following message:
%DEBUG-I-SOURCESCOPE, Source lines not available for .0\%PC.
        Displaying source in a caller of the current routine.
|
Source lines may not be available for the following reasons:
This section discusses the following topics:
There are two commands for starting or resuming program execution: GO and STEP. The GO command starts execution. The STEP command executes a specified number of source lines or instructions.
The GO command starts program execution, which continues until forced to stop. The GO command is used most often in conjunction with breakpoints, tracepoints, and watchpoints (described in Sections 3.3.5.3, 3.3.5.4, and 3.3.5.5). If you set a breakpoint in the path of execution and then issue the GO command, execution is suspended at that breakpoint. If you set a tracepoint, the path of execution through that tracepoint is monitored. If you set a watchpoint, execution is suspended when the value of the watched variable changes.
You can also use the GO command to test for an exception condition or an infinite loop. If an exception condition that is not handled by your program occurs, the debugger takes control and displays the DBG> prompt so that you can issue commands. If you are using screen mode, the pointer in the source display indicates where execution stopped. You can use the SHOW CALLS command (explained in Section 3.3.5.2) to identify the currently active routine calls (the call stack).
If an infinite loop occurs, the program does not terminate, so the debugger prompt does not reappear. To obtain the prompt, interrupt the program by pressing Ctrl/y and then issue the DCL command DEBUG. You can then look at the source display and invoke a SHOW CALLS display to obtain the current PC value.
The STEP command allows you to execute a specified number of source lines or instructions, or to execute the program to the next instruction of a particular kind, for example, to the next CALL instruction.
By default, the STEP command executes a single source line at a time. In the following example, the STEP command executes one line, reports the action stepped to..., and displays the line number (27) and source code of the next line to be executed:
DBG> STEP
stepped to TEST\COUNT\%LINE 27
     27:   X = X + 1;
DBG>
|
The PC value is now at the first machine code instruction for line 27 of the module TEST; line 27 is in COUNT, a routine within the module TEST. TEST\COUNT\%LINE 27 is a path name. The debugger uses path names to refer to symbols. (You do not need to use a path name in referring to a symbol, however, unless the symbol is not unique. If the symbol is not unique, the debugger issues an error message. See Section 3.3.7.2 for more information on resolving multiply defined symbols.)
The STEP command can execute a number of lines at a time. In the following example, the STEP command executes three lines:
DBG> STEP 3 |
Note that only those source lines for which code instructions were generated by the compiler are recognized as executable lines by the debugger. The debugger skips over any other lines, for example, comment lines.
Also, if a line contains more than one statement, the debugger executes all the statements on that line as part of the single step.
You can specify different stepping modes, such as stepping by instruction rather than by line (SET STEP INSTRUCTION). Also, by default, the debugger steps over called routines; execution is not suspended within a called routine, although the routine is executed. Issuing the SET STEP INTO command causes the debugger to suspend execution within called routines, as well as within the routine that is currently executing.
| Previous | Next | Contents | Index |